Databases
This section describes the procedures required to include the databases source in a project, enter database connection information, test a database connection, reset search defaults, open results with the desired viewer / editor, and apply various database search filters.
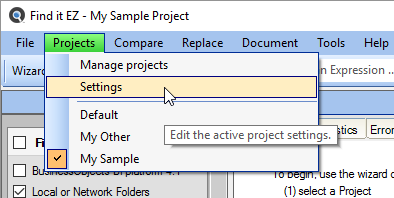
To access project settings for databases:
-
Edit the active project using the menu.
-
In the frame on the left, in the Location category, locate the Databases sub category.
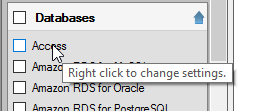
Note: You may access the same dialog box with a simple right-click on the desired database in the expanded Source panel on the left of the main application screen.
-
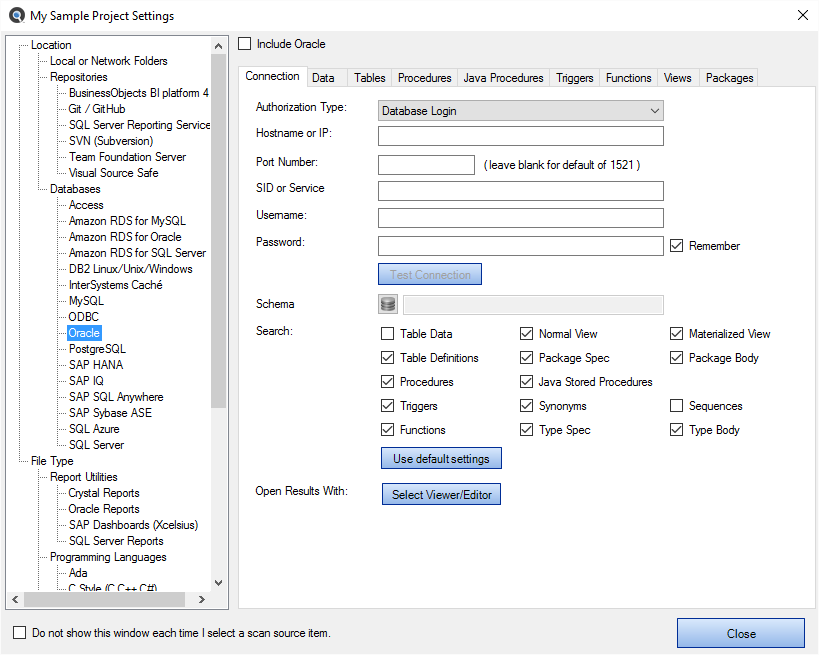
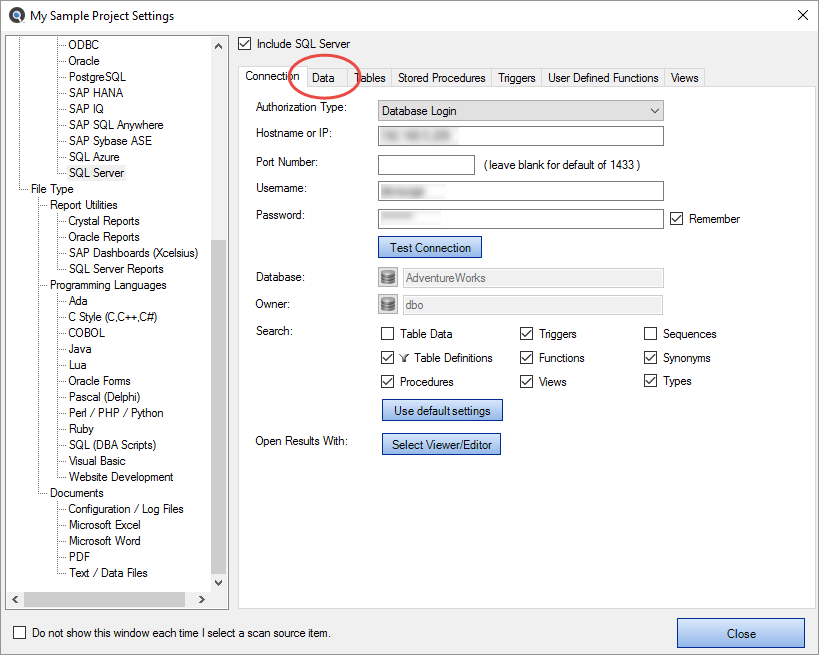
Click on the desired database name. In the first example below, we have selected the Oracle database:
In the second example below, we have selected the SQL Server database:
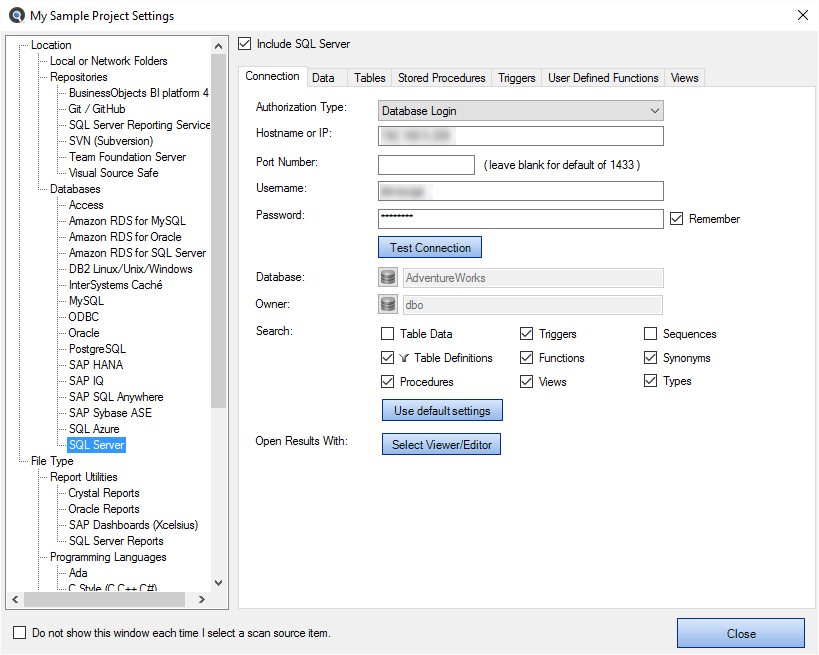
Connection Information - Databases
- For the selected database, select and/or enter the required connection information. Depending upon the database selected, these settings could include:
- File Extensions Searched
- Password
- Search [Options]
- Hostname or IP
- Port Number
- Username
- Database
- Authorization Type
- SID or Service
- Schema
- Owner
- Classes
- DSN
- Instance Number
-
To have Find it EZ remember your password between sessions, click to check the Remember check-box. The default settings is enabled (i.e. checked).
Note: If not saved, each time you start the Find it EZ program, you would be required to re-enter active project database connection passwords. Otherwise, the attempt to authenticate your secure connections would fail for any index, search, compare, replace or document process.Alert: Passwords are not saved in plain-text; however, if you chose to save passwords, it is recommended that you make an effort to secure access to the configuration database.
-
Click on the button to apply your changes.
Test Database Connection
To test your connection, click on the button.

-
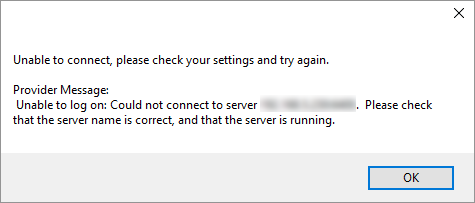
If the test is unsuccessful, you will receive an "Connection failed!" message, along with a Reason. Check your settings and try again.
Note: The error handling system will provide up to two messages / alerts:
- Find it EZ will indicate, in general, what happened (e.g. "Unable to connect.").
- The called program may, at times, return a more detailed message that is proprietary to that target system and often provides you with more details to help you resolve the "why" we were unable to connect. We are not in control of the content of that message or when / if it comes back, but we will always display and log the extra details whenever possible.
-
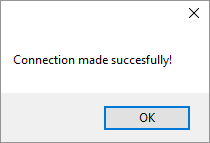
If the test is successful, you will receive a "A connection was made successfully!" message.
Reset Search Defaults
On the database Connection tab or BI Reports Options tab (see links below), the Search section contains a number of items for which you can search. To include a set of database objects, select an item and click to check the preceding check-box.
For each database type, there is a set of default database objects normally used for code change impact analysis. To restore the selections to the default settings that came with your Find it EZ install, click on the button. This will also reset all individual database object filters to “include all items”.
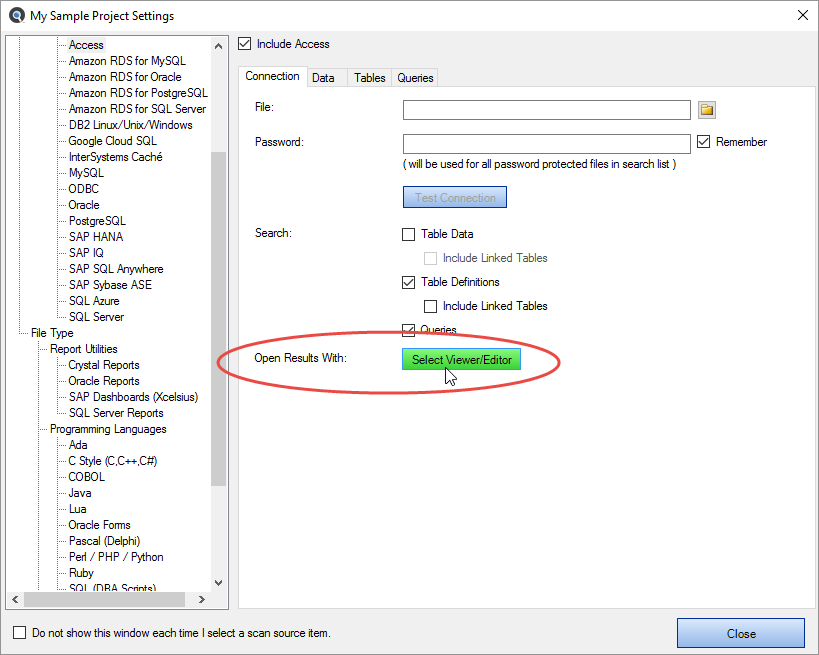
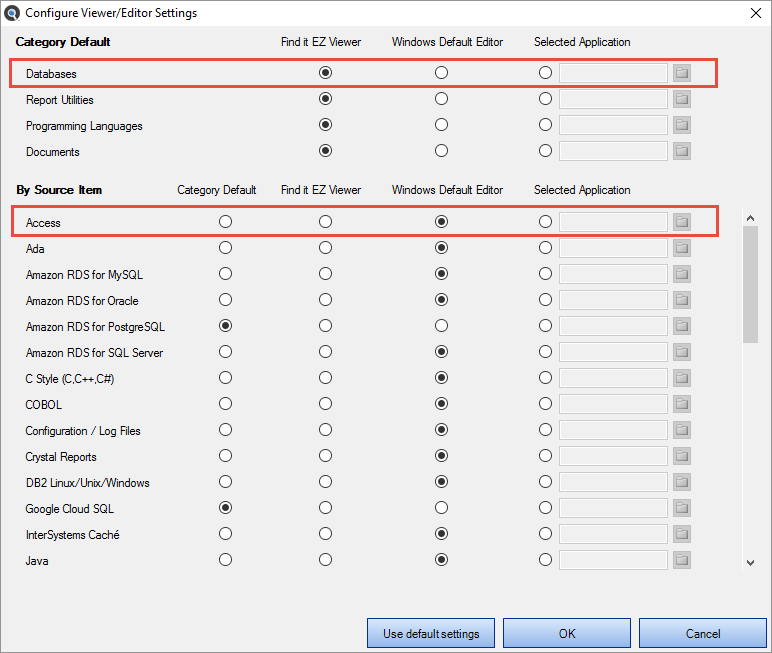
Open Results With
To specify the viewer / editor with which you want to open search results for the selected database, locate the Open Results With field and click on the corresponding button.
Apply Database Item Filters
Depending upon the database selected, you may be presented with a number of filter options from which to choose, including:
- Data
- Tables
- Stored Procedures
- Triggers
- User Defined Functions
- Views
- Java Procedures
- Functions
- Packages
- Events
Each of these tabs allow you to select between including all corresponding database object items, or only specific subset of items. This allows you to expedite the subsequent (re)indexing process as well as reduce false-positive matches in your search results.
Click on the desired filter tab (see examples below).
You may use the File Filter tab to include only a subset of specific files within the configured path(s). You must first add the desired source path folders. This filter is often used to minimize false positives or expedite indexing and searching by limiting the number of file contents included in a project. This setting can be quickly changed to include all or a subset of files as needed.
To apply a Data filter:
-
Open the desired Database dialog box.
-
Click to select the desired Data tab.
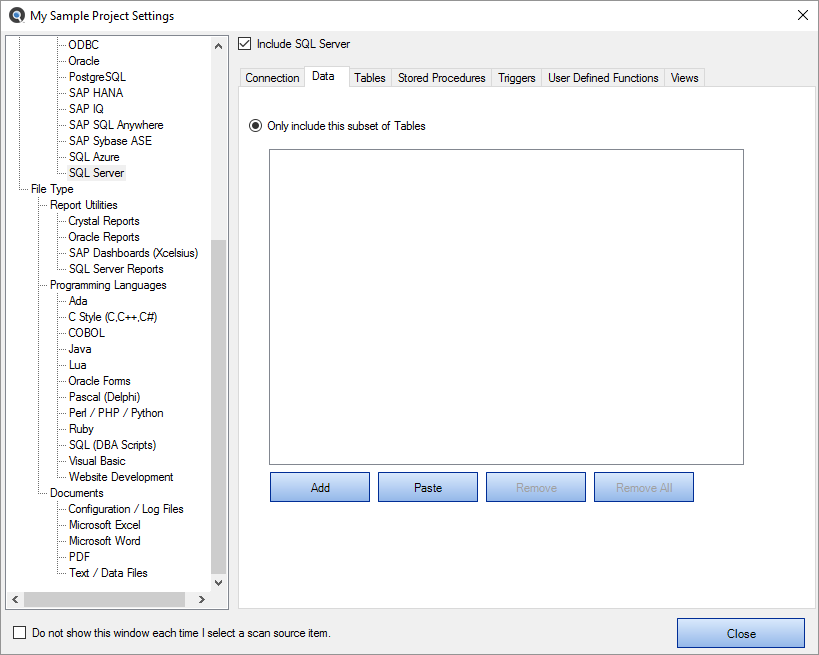
- To add a subset:
Click on the button. An Add Filter dialog will appear.
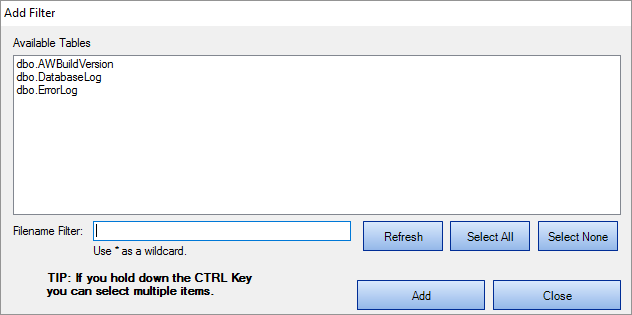
The Available Tables list will be populated with a list of tables included in the folders selected previously on the Options tab.
Click to select the desired table(s).
Note: Select multiple items by holding down the Ctrl key. Or, click on the button or the button, or the button as desired.- To filter by table name, use the Filename Filter:
Select one or more items from the list.
Tip: Use the button or hold the Ctrl key then click to select multiple items.
- Once complete, click on the button. The selected tables will be added to the Only include this subset of Tables list.
Repeat steps 3a through 3e to add additional tables as desired.
AND / OR
- To paste a subset from the clipboard:
- Click on the button. The clipboard contents will be added directly to the Only include this subset of Tables list.
Optionally repeat Copy then Paste additional fully qualified filenames until completed.
Alert: The clipboard may contain a single file or list of filenames, but each line must be formatted with a fully qualified path.
- To remove file(s):
- To remove all files from the list, click on the button.
- To remove only selected table(s) from the list, click to select the table(s) you want to remove, then click on the button.
-
Click on the button to apply your changes.
To apply a Stored Procedures filter:
-
Open the desired Database dialog box.
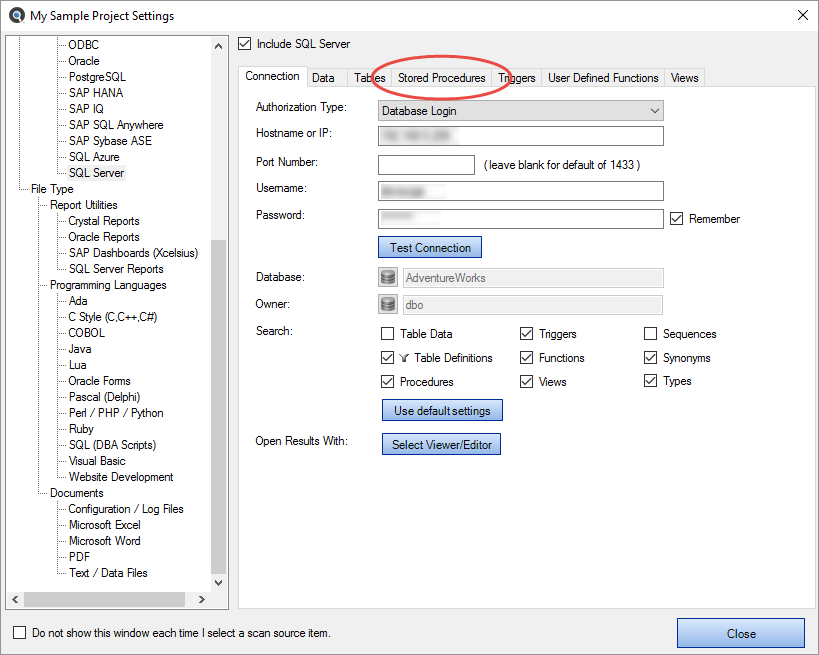
-
Click to select the Stored Procedures tab.
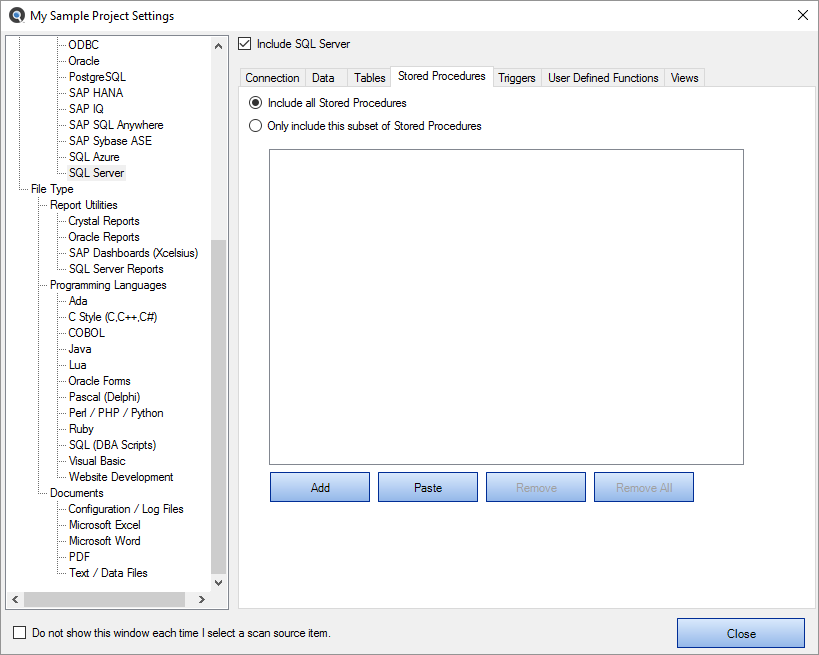
-
To include all stored procedures, click to choose the Include all Stored Procedures option. This is the default selection.
OR
- To include only a subset of files, click to choose the Only include this subset of Stored Procedures option.
- To add a subset:
Click on the button. An Add Filter dialog will appear.
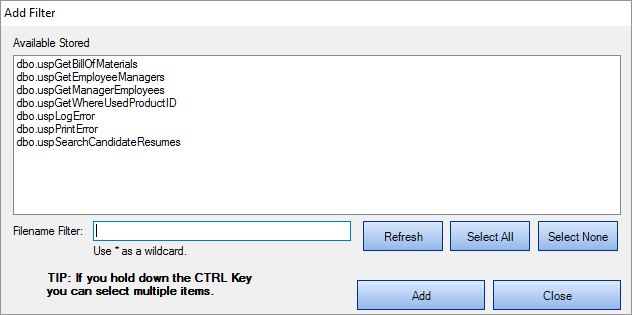
The Available Stored Procedures list will be populated with a list of stored procedures included in the folders selected previously on the Options tab.
Click to select the desired stored procedure(s).
Note: Select multiple items by holding down the Ctrl key. Or, click on the button or the button, or the button as desired.- To filter by file name, use the Filename Filter:
Click inside the Filename Filter text box.
Enter the desired file name filter, using wildcards as desired (e.g. *.cs, *.js, *user*, etc.).
Note: This filter applies to the stored procedure name itself, and does not apply to the drive letter, folders or path names.
Select one or more items from the list.
Tip: Use the button or hold the Ctrl key then click to select multiple items.
- Once complete, click on the button. The selected stored procedures will be added to the Only include this subset of Stored Procedures list.
Repeat steps 5a through 5e to add additional stored procedures as desired.
AND / OR
- To paste a subset from the clipboard:
- Click on the button. The clipboard contents will be added directly to the Only include this subset of Stored Procedures list.
Optionally repeat Copy then Paste additional fully qualified filenames until completed.
Alert: The clipboard may contain a single file or list of filenames, but each line must be formatted with a fully qualified path.
- To remove file(s):
- To remove all files from the list, click on the button.
- To remove only selected stored procedure(s) from the list, click to select the stored procedures you want to remove, then click on the button.
-
Click on the button to apply your changes.
Tip: Each of the database item filters, other than “table data”, work in the same way as a file filter. However, when using wildcards to select database objects some include the object schema or owner in the format: owner.objectname . You may filter the selection list to include all objects belonging to a specific owner as follows: owner.*