Viewer / Editor Settings
The File Association dialog settings allow you to select the viewer / editor used to open a search result list item, as well as to add or remove custom file extensions to be processed by available "search syntax" within the Find it EZ indexing engine. This ability to customize how various file types are handled by the Find it EZ application is useful in situations where corporate naming standards require use of a unique file extension such as ".common" for shared JAVA program modules. The ".common" extension is not recognized as a universal standard JAVA type file, but using this custom file type association within Find it EZ, you can configure the product to treat all files with the ".common" extension as containing JAVA code and to include and process them the same as any other standard JAVA programming language file for example.
-
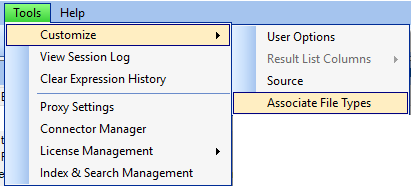
From the Find it EZ menu, select .

-
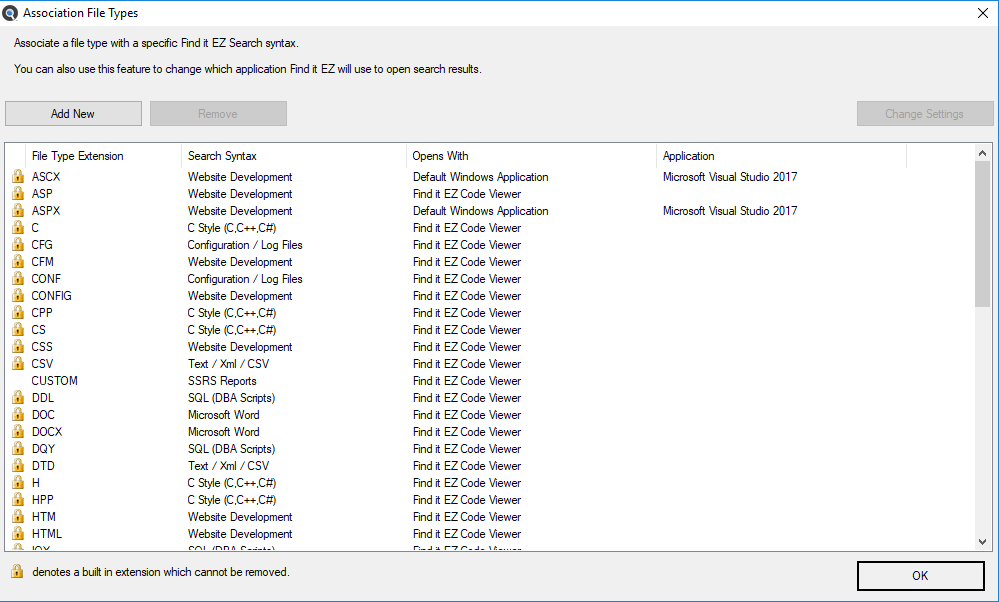
The Associate File Types dialog box will appear, as below:

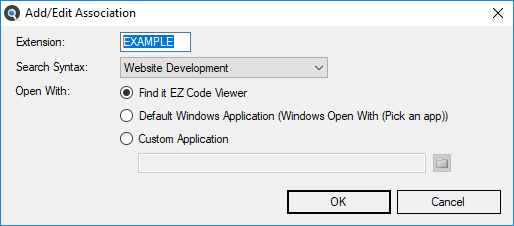
- To add a new file type, click the button, the Associate File Type - Add / Edit dialog will appear as below:
 Note: The Default Windows Application radial button option will automatically reflect "known" extensions on your system. For example, typing in the Extension "TXT" will show (NotePad) by default unless you have selected some other editor to open .TXT files.
- Enter the custom file type you would like to add for processing by Find it EZ in the Extension field.
- Select one of the available Find it EZ Search Syntax modules from the drop down list. This will direct the way in which the contents of the files with this extension are to be parsed by our search engine.Note: The list of search syntax options are limited based on the current set of document source types enabled within the Customization Wizard. To add more search syntax options, you must first add one or more file types associated with that syntax.
- Choose one of the following viewer / editor Open With options:
- Find it EZ Viewer
- Default Windows Application
- Custom Application
- IF Custom Application is chosen:
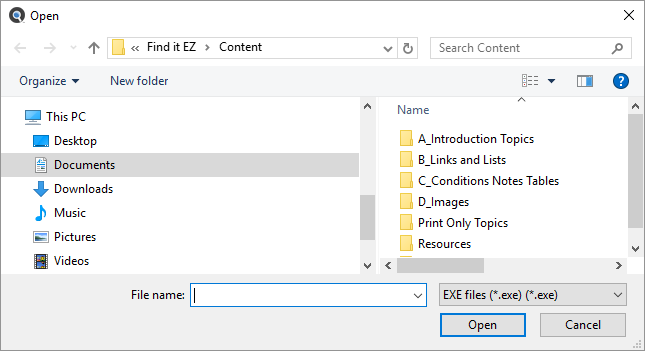
Click on the corresponding folder icon to the right of the Custom Application text box. An Open dialog box will appear.

- Navigate to the program application you want to use to open this type of file.
- Click on the button.
- To save any changes and close the Associate File Types - Add / Edit dialog box, click on the button.
- To discard changes, click on the button.
To change the Open With program for an existing file type listed:
- Click to select ( highlight ) a file type in the list.
- Click the Change Settings button.
- The Associate File Types Add / Edit dialog will appear.
- Change the Open With settings as desired. See above for Custom Application settings instructions.
- Click on the button to save and close.
To remove a custom file type:
- Click to select ( highlight ) any custom file type. You can not delete any built-in file types identified by a locked image

- Click on the button.
- Click on the button to save and close.
Alert: You can add duplicate file type extension entries, but each must be unique by Search Syntax. Duplicate entries will process files with that extension using each unique Search Syntax selected. This may produce duplicate search results for the same file and is not recommended.