View or Edit Proxy Settings
If your corporate network uses a proxy server firewall to manage all incoming and outgoing (Internet) traffic, you will need to configure settings within a running Find it EZ program to enable automated “check for updates on start-up” as well as automated download and install of optional connectors or upgrades.
- activation.finditez.net ( for update checks and automated product activation )
- cdn.finditez.com ( for integrated product and connector setup file downloads )
Please contact your Network Administrator to ensure these website address' are white-listed in your proxy server.
There are three ways you can enter proxy settings. In all cases, the settings are saved between sessions. Note that saved passwords, if required for your proxy, are automatically encrypted for security.
From the Program Activation Dialog Window:
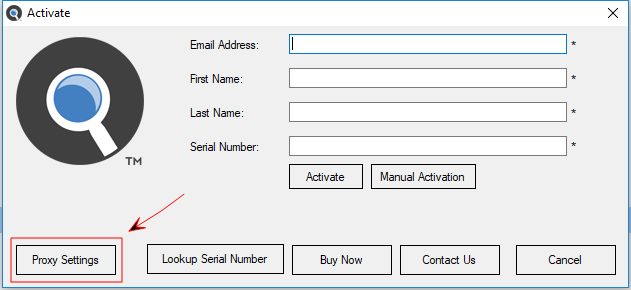
- Before clicking on the button, check your Proxy Settings.
-
Click on the button. The Proxy Settings dialog box will appear.
-
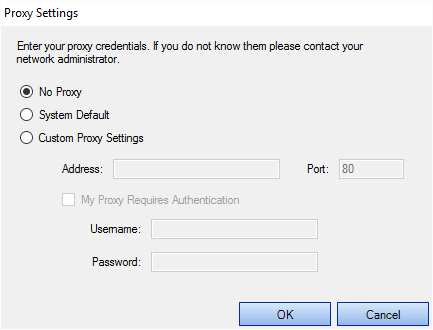
Choose System Default and/or enter Custom Proxy Settings, as required for your network.
Note: If you don't know your proxy settings, please contact your Network Administrator. - To save your changes and close the Proxy Settings dialog box, click on the button.
From the Program Main Menu:

-
Select .
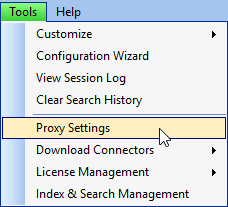
The Proxy Settings dialog box will appear, as below:
-
Choose System Default and/or enter Custom Proxy Settings, as required for your network.
Note: If you don't know your proxy settings, please contact your Network Administrator. - To save your changes and close the Proxy Settings dialog box, click on the button.
From any Download Dialog Window:
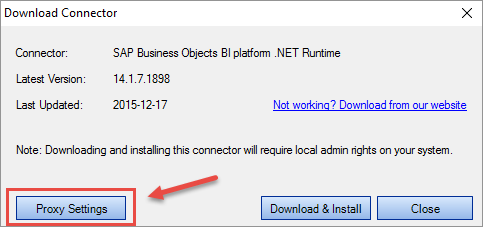
- Before clicking on the button, check your Proxy Settings.
-
Click on the button. The Proxy Settings dialog box will appear.
-
Choose System Default and/or enter Custom Proxy Settings, as required for your network.
Note: If you don't know your proxy settings, please contact your Network Administrator. - To save your changes and close the Proxy Settings dialog box, click on the button.